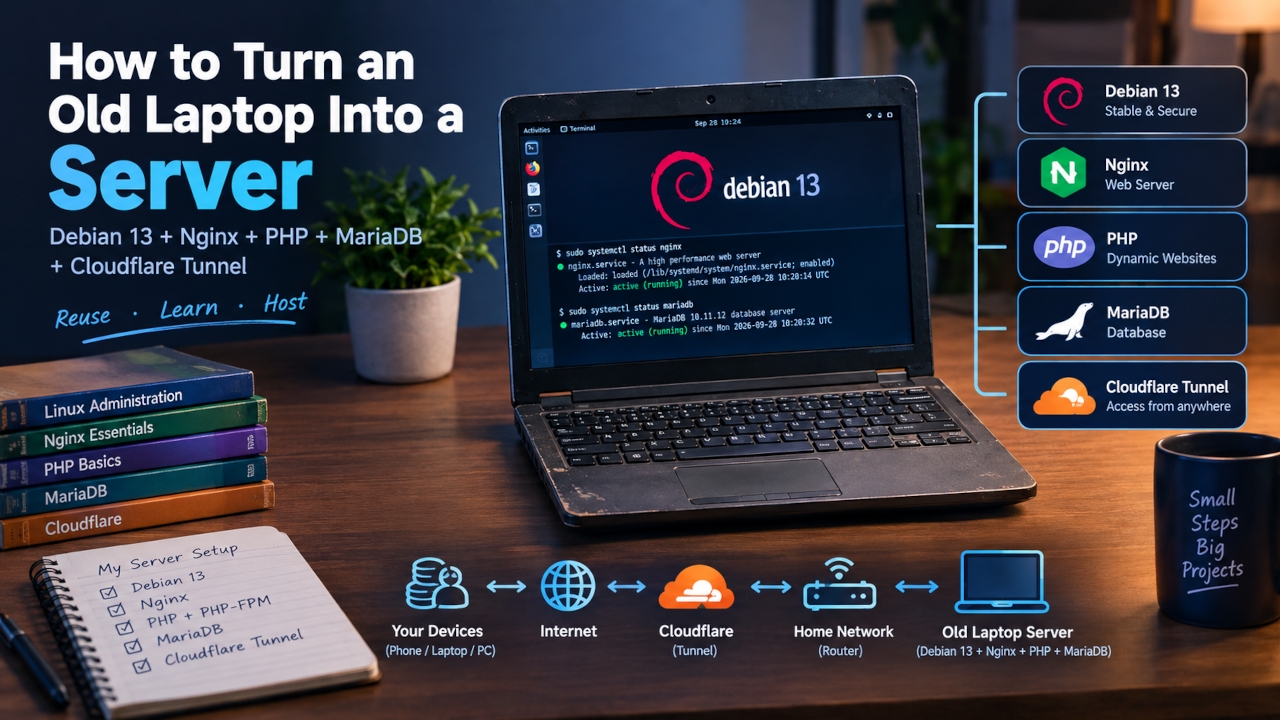
Do you have an old laptop that is no longer powerful enough for everyday use? Instead of leaving it unused, you can turn it into a useful home server. An old laptop can run Linux, host websites, serve applications, run databases and provide a development environment without requiring a dedicated server computer.
In this guide, we will build a practical home server using Debian 13, Nginx, PHP and MariaDB. We will then use Cloudflare Tunnel to make a website available on the internet without relying on traditional router port forwarding.
This setup is especially useful if you want to learn Linux server administration, web hosting, PHP development, databases, DNS, HTTPS and self-hosting using hardware you already own.
What Is a Home Server?
A home server is a computer that continuously provides services to other devices over a local network or the internet. It does not have to be an expensive rack server. A desktop PC, mini PC, Raspberry Pi or old laptop can all be used as a server.
In this setup, the old laptop becomes a Linux server. Instead of using the laptop as a normal desktop computer, Debian runs server software in the background and Nginx handles incoming web requests.
| Component | Purpose |
|---|---|
| Old laptop | Provides the CPU, RAM, storage and network connection |
| Debian 13 | Server operating system |
| Nginx | Web server and reverse proxy |
| PHP | Runs PHP-based websites and applications |
| MariaDB | Database server |
| SSH | Remote server administration |
| Cloudflare Tunnel | Connects the local server to the internet without traditional port forwarding |
Why Turn an Old Laptop Into a Server?
An old laptop already contains most of the hardware required for a basic server. You can reuse its processor, RAM, storage and network hardware instead of buying another computer.
- Reuse an old laptop instead of throwing it away
- Learn Linux and server administration
- Host websites and web applications
- Create a personal development server
- Run PHP applications
- Run MariaDB databases
- Experiment with self-hosting
- Host private services on your local network
- Learn Nginx configuration
- Learn DNS, HTTPS and Cloudflare Tunnel
Can an Old Laptop Really Run a Server?
Yes. Many old laptops are capable of running lightweight server workloads. The amount of CPU power, RAM and storage you need depends on what you plan to host.
| Hardware | Recommended Consideration |
|---|---|
| CPU | A 64-bit processor is suitable for many Linux server workloads |
| RAM | 4 GB can be enough for lightweight websites and services |
| Storage | An SSD is strongly recommended for better responsiveness |
| Network | Ethernet is preferable for an always-on server |
| Cooling | The laptop should have adequate ventilation |
| Battery | A healthy battery can provide temporary power backup |
What Can You Host on an Old Laptop Server?
Once Debian 13 and the required software are installed, the laptop can be used for many different projects.
- Personal websites
- PHP websites
- Laravel applications
- REST APIs
- Development environments
- MariaDB databases
- Private file storage
- Local dashboards
- Testing and staging websites
- Git repositories
- Home automation services
- Small personal applications
Why Use Debian 13?
Debian is a popular Linux distribution for servers because it provides a stable package ecosystem, extensive documentation and a large collection of server software.
Debian 13 is particularly suitable for this project because it can be installed without a graphical desktop environment, leaving the laptop's resources available for server applications.
A minimal Debian installation also means you can install only the services you actually need instead of running a full desktop environment on a machine that is intended to operate as a server.
Step 1: Back Up Your Old Laptop
Before installing Debian 13, back up anything important currently stored on the laptop. Depending on your installation choices, installing Debian can erase the existing operating system and data.
- Copy important documents to another storage device.
- Back up photos and videos.
- Save important project files.
- Export browser bookmarks if required.
- Back up configuration files.
- Verify that your backup works before deleting the original data.
Step 2: Install Debian 13
Download the Debian 13 installation image from the official Debian website and create a bootable USB drive.
For a dedicated home server, a minimal installation without a graphical desktop environment is generally preferable. You will administer the machine using the terminal and SSH.
- Download the Debian 13 installation image.
- Create a bootable USB drive.
- Connect the USB drive to the old laptop.
- Boot the laptop from the USB drive.
- Start the Debian installer.
- Choose your language and keyboard layout.
- Configure the network.
- Create your user account.
- Partition the storage carefully.
- Install the base Debian system.
- Install SSH when offered by the installer.
- Finish the installation and reboot.
Step 3: Update Debian 13
After the first boot, update the package lists and install the latest available updates.
sudo apt update
sudo apt upgrade
Keeping the server updated is an important part of maintaining a secure Linux system.
Step 4: Find the Server's Local IP Address
Your laptop will normally receive a private IP address from your home router. You can find the current address using the ip command.
ip addrLook for the IP address associated with the network interface connected to your home network. It may look similar to 192.168.1.100.
Step 5: Give the Server a Stable Local IP
A server is easier to manage when its local IP address does not unexpectedly change. One convenient solution is to create a DHCP reservation in your router so the same laptop consistently receives the same local address.
Step 6: Install and Configure SSH
SSH allows you to administer the Debian server remotely from another computer. Once SSH is working, you do not need to keep a monitor and keyboard connected to the laptop.
sudo apt install openssh-server
sudo systemctl enable --now ssh
From another computer connected to the same network, you can connect to the server using its local IP address.
ssh [email protected]Replace username with your Debian account name and replace 192.168.1.100 with the actual IP address of your server.
Step 7: Install Nginx
Nginx will be the web server for our Debian 13 home server. It receives HTTP and HTTPS requests and serves static files or passes dynamic requests to application services such as PHP-FPM.
sudo apt update
sudo apt install nginx
After installing Nginx, check whether the service is running.
sudo systemctl status nginxYou can also open the server's local IP address in a browser from another device on your home network. If Nginx is configured correctly, its default page should appear.
Why Use Nginx Instead of Apache?
Both Apache and Nginx are widely used web servers, but this setup uses Nginx because it is lightweight, efficient and well suited to serving static files, handling HTTP requests and acting as a reverse proxy.
| Feature | Nginx |
|---|---|
| Static files | Excellent |
| Reverse proxy | Built-in capability |
| PHP applications | Works with PHP-FPM |
| Multiple websites | Supported through server blocks |
| Resource usage | Efficient for many common workloads |
Step 8: Install PHP and PHP-FPM
If you want to host PHP websites or applications, install PHP and PHP-FPM. PHP-FPM allows Nginx to pass PHP requests to the PHP processing service.
sudo apt install php-fpm php-cli php-mysqlCheck the installed PHP version with:
php -vThe exact PHP-FPM socket name depends on the PHP version installed by Debian. You should check the available PHP-FPM service and socket before configuring Nginx.
Step 9: Install MariaDB
MariaDB provides a relational database for websites and applications that need persistent structured data.
sudo apt install mariadb-serverAfter installation, check the database service.
sudo systemctl status mariadbApplications should normally connect to MariaDB locally or through a private network rather than exposing the database directly to the public internet.
Step 10: Create a Website Directory
Nginx can serve your website from a directory on the server. For example, you can create a directory for a website under /var/www.
sudo mkdir -p /var/www/example
sudo chown -R $USER:$USER /var/www/example
You can then place your website files inside that directory.
Step 11: Configure an Nginx Server Block
Nginx uses server blocks to define how domains and websites should be handled. A simple server block can point a domain to your website directory.
server {
    listen 80;
    server_name example.com www.example.com;

    root /var/www/example;
    index index.php index.html;

    location / {
        try_files $uri $uri/ /index.php?$query_string;
    }

    location ~ \.php$ {
        include snippets/fastcgi-php.conf;
        fastcgi_pass unix:/run/php/php-fpm.sock;
    }
}
The PHP-FPM socket shown in the example is illustrative. On Debian, check the actual socket created by the installed PHP version and use that path in the Nginx configuration.
Step 12: Test the Nginx Configuration
Before reloading Nginx after configuration changes, test the configuration syntax.
sudo nginx -tIf the configuration test succeeds, reload Nginx.
sudo systemctl reload nginxStep 13: Configure the Firewall
A firewall can restrict unnecessary network connections. If you use UFW, allow SSH and web traffic before enabling it.
sudo apt install ufw
sudo ufw allow OpenSSH
sudo ufw allow 'Nginx Full'
sudo ufw enableHow to Access the Nginx Server Locally
At this point, the Nginx server should be accessible from another device connected to your home network.
http://192.168.1.100Replace the example address with your server's actual local IP address.
Why Your Local Server Is Not Automatically Public
A server running inside your home network normally has a private IP address. Private addresses such as 192.168.x.x are not directly reachable from the public internet.
Your router sits between the local network and the internet. To publish a service, you need a way for internet traffic to reach the appropriate application.
Traditional Port Forwarding vs Cloudflare Tunnel
| Feature | Port Forwarding | Cloudflare Tunnel |
|---|---|---|
| Router configuration | Usually required | Usually not required |
| Inbound ports | Opened on the router | No traditional inbound port required for the tunnel connection |
| Public IP considerations | Important | Can work without directly exposing the home IP to visitors |
| Setup | Router and server configuration | Cloudflare account, tunnel and connector configuration |
| Useful for home networks | Yes | Yes |
Step 14: Install Cloudflare Tunnel
Cloudflare Tunnel allows your local server to establish an outbound connection to Cloudflare. This can be used to publish a local web application without configuring traditional inbound port forwarding on the home router.
The Cloudflare connector software is commonly called cloudflared. After installing and authenticating it, you can create a tunnel and associate a hostname with your local Nginx service.
Cloudflare Tunnel documentation
Step 15: Authenticate Cloudflare Tunnel
Install cloudflared using the current instructions provided by Cloudflare for Debian. Then authenticate the connector with your Cloudflare account.
cloudflared tunnel loginThe authentication process associates the connector with your Cloudflare account and allows you to create and manage tunnels.
Step 16: Create a Cloudflare Tunnel
Create a named tunnel using cloudflared. Choose a meaningful tunnel name so that it is easy to identify later.
cloudflared tunnel create my-home-serverThe command creates the tunnel and generates credentials that allow the connector to establish the tunnel.
Step 17: Connect Your Domain to the Tunnel
After creating the tunnel, you can associate a hostname from a domain managed through Cloudflare with the tunnel.
cloudflared tunnel route dns my-home-server example.comReplace my-home-server with your tunnel name and example.com with your actual domain or hostname.
Step 18: Point the Tunnel to Nginx
The important part of the tunnel configuration is telling cloudflared where your local web server is running. Since Nginx is listening locally, the tunnel can forward requests to the local HTTP service.
tunnel: YOUR-TUNNEL-ID
credentials-file: /root/.cloudflared/YOUR-TUNNEL-ID.json

ingress:
  - hostname: example.com
    service: http://localhost:80
  - service: http_status:404
The exact location of the configuration and credentials should follow the cloudflared installation and service configuration you use. Replace the example tunnel ID and hostname with your own values.
Step 19: Run Cloudflare Tunnel as a Service
For a server that should remain available after reboots, configure cloudflared to run as a system service.
sudo cloudflared service install
sudo systemctl enable --now cloudflared
Check the service status if you want to confirm that the connector is running.
sudo systemctl status cloudflaredHow the Complete Setup Works
The completed architecture is straightforward. A visitor requests your domain, Cloudflare receives the request, the Cloudflare Tunnel connects the request to your home server and Nginx handles the website request locally.
| Layer | Component | Role |
|---|---|---|
| 1 | Visitor | Requests your website |
| 2 | Cloudflare | Receives and processes the public request |
| 3 | Cloudflare Tunnel | Connects Cloudflare to your local server |
| 4 | Nginx | Handles the web request |
| 5 | PHP | Processes PHP applications when required |
| 6 | MariaDB | Stores application data |
Old Laptop Server Architecture
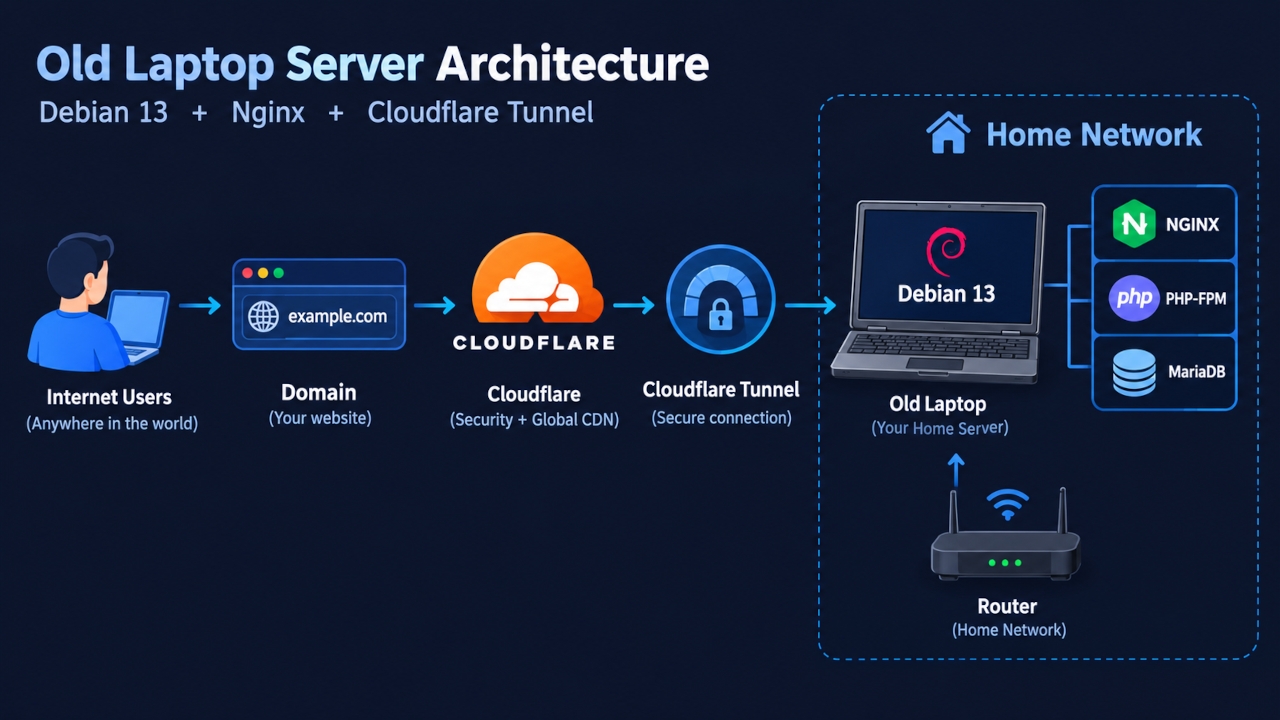
This architecture allows the old laptop to remain inside your home network while the tunnel provides the connection between Cloudflare and the local Nginx server.
Does Cloudflare Tunnel Replace Nginx?
No. Cloudflare Tunnel and Nginx perform different jobs. Cloudflare Tunnel provides the connection between Cloudflare and your local service, while Nginx acts as the web server that handles HTTP requests on your Debian machine.
Do You Need Port Forwarding With Cloudflare Tunnel?
A typical Cloudflare Tunnel setup does not require traditional inbound port forwarding on your home router. The cloudflared connector running on your server establishes the connection outward to Cloudflare.
Do You Need a Static Public IP?
A traditional port-forwarded server may require additional consideration when the public IP address changes. A Cloudflare Tunnel can avoid the need to expose the home server through a directly reachable public IP address.
How to Keep the Old Laptop Running 24/7
If the laptop will act as an always-on server, make sure it has adequate ventilation and does not overheat. You can turn off the display while allowing Debian and its services to continue running.
- Keep the air vents clear.
- Clean accumulated dust when necessary.
- Keep the laptop on a hard, ventilated surface.
- Monitor CPU temperature.
- Monitor disk health.
- Use an SSD if possible.
- Avoid unnecessary graphical applications.
- Keep Debian updated.
Why an SSD Is Useful for an Old Laptop Server
If your old laptop still uses a mechanical hard drive, replacing it with an SSD can make the server feel significantly more responsive. Booting, package installation, application startup and database operations can all benefit from faster storage.
An SSD is not mandatory for a home server, but it is one of the most useful upgrades for an old laptop that will be used continuously.
How to Monitor Your Debian Server
Linux includes several useful commands for checking server performance and available resources.
| Command | Purpose |
|---|---|
| top | Monitor running processes and CPU usage |
| free -h | Check memory usage |
| df -h | Check available disk space |
| uptime | Check uptime and system load |
| ip addr | View network interfaces and IP addresses |
| systemctl status nginx | Check Nginx |
| systemctl status mariadb | Check MariaDB |
| systemctl status cloudflared | Check Cloudflare Tunnel |
How to Secure Your Debian Home Server
Once a home server becomes accessible from the internet, security becomes especially important. The server should be maintained just like any other internet-connected computer.
- Keep Debian updated.
- Keep Nginx and PHP updated.
- Keep your applications updated.
- Use strong passwords.
- Use SSH keys where practical.
- Configure a firewall.
- Do not expose MariaDB directly to the internet.
- Use HTTPS for public websites.
- Use separate application database accounts.
- Create regular backups.
- Monitor server logs.
- Remove services you do not need.
How to Back Up Your Home Server
A home server is not automatically a backup. If the laptop's storage fails, data stored only on that laptop can be lost. Keep important website files, databases and configuration files on separate backup storage.
- Back up website files.
- Back up databases.
- Back up Nginx configurations.
- Back up important application configuration.
- Keep at least one backup on separate storage.
- Periodically test that the backups can actually be restored.
Can an Old Laptop Host a PHP Website?
Yes. Debian 13, Nginx, PHP-FPM and MariaDB provide a complete environment for many PHP websites and applications. This combination is also suitable for learning how production-style Linux web hosting works.
Can an Old Laptop Host a Laravel Website?
Yes. A Laravel application can run on a Debian server with Nginx, PHP-FPM, Composer and a supported database such as MariaDB. Depending on the application, you may also need additional services for queues, scheduled tasks, caching or other background processing.
Can an Old Laptop Host Multiple Websites?
Yes. Nginx can host multiple websites using separate server blocks. Each domain or subdomain can point to its own website directory or application.
Cloudflare Tunnel can also be configured to route different hostnames to different local services, allowing one home server to provide multiple web applications.
Old Laptop Server vs Web Hosting
| Feature | Old Laptop Server | Shared Web Hosting |
|---|---|---|
| Hardware control | Full control | Limited |
| Software control | Very high | Provider dependent |
| Server maintenance | You manage it | Mostly managed by provider |
| Learning opportunity | Very high | Lower |
| Reliability | Depends on your hardware, electricity and internet | Depends on hosting provider |
| Scalability | Limited by your hardware | Usually easier to upgrade |
| Customization | Very high | Limited by hosting environment |
An old laptop is particularly useful for learning, development, testing and personal projects. A professionally managed hosting environment may be more appropriate when a website requires predictable uptime, high availability, managed backups or significant scaling.
Common Problems With an Old Laptop Server
| Problem | Possible Cause |
|---|---|
| Nginx does not start | Configuration error or another service using the required port |
| SSH does not connect | Wrong IP address, SSH service or firewall configuration |
| Server IP changed | Router assigned a different DHCP address |
| Website works locally but not publicly | Cloudflare Tunnel, DNS or Nginx configuration issue |
| PHP page downloads instead of running | PHP-FPM or Nginx PHP configuration is incorrect |
| Database connection fails | MariaDB service, credentials or application configuration |
| Server becomes slow | CPU, RAM, storage or application workload |
| Server shuts down | Power, overheating, battery or hardware problem |
| Cloudflare website shows an error | Tunnel, DNS, origin or Nginx configuration issue |
Old Laptop Home Server Checklist
- Back up the old laptop.
- Install Debian 13.
- Update Debian.
- Configure the network.
- Reserve a stable local IP address.
- Install SSH.
- Install Nginx.
- Install PHP and PHP-FPM.
- Install MariaDB.
- Configure Nginx server blocks.
- Configure the firewall.
- Create website backups.
- Install and authenticate cloudflared.
- Create a Cloudflare Tunnel.
- Connect your domain to the tunnel.
- Point the tunnel to Nginx.
- Run cloudflared as a service.
- Test the website from outside your home network.
- Monitor the server regularly.
Frequently Asked Questions
Can I turn an old laptop into a server?
Yes. Install a server-oriented Linux distribution such as Debian 13 and configure the software required by your project. An old laptop can host websites, applications, databases and other services.
Can I use Debian 13 as a home server?
Yes. Debian 13 can be used as a home server operating system for websites, applications, databases, file services and development environments.
Can a 4GB RAM laptop run Debian 13 as a server?
A 4GB RAM laptop can handle many lightweight server workloads when using a minimal Debian installation. The practical limit depends on the number and resource requirements of the services you run.
Is Nginx good for an old laptop server?
Nginx is well suited to lightweight web hosting and can serve static files, handle HTTP requests and work as a reverse proxy. It can also pass PHP requests to PHP-FPM.
Can I host a website from my home?
Yes. You can host a website from a home server. A tunnel service such as Cloudflare Tunnel can provide a way to publish a local web service without traditional inbound port forwarding.
Can I use Cloudflare Tunnel instead of port forwarding?
Yes. Cloudflare Tunnel is designed to connect services running in private networks to Cloudflare through an outbound connection. This can be an alternative to traditional inbound port forwarding for many web applications.
Do I need a public IP address for Cloudflare Tunnel?
A typical Cloudflare Tunnel setup does not require your local web server to have a directly reachable public IP address. The cloudflared connector establishes an outbound connection to Cloudflare.
Can I host multiple websites on one old laptop?
Yes. Nginx can serve multiple websites using separate server blocks. Cloudflare Tunnel can also route different hostnames to the appropriate local services.
Should I use Wi-Fi or Ethernet for my server?
Ethernet is generally preferable for an always-on server because it provides a stable wired connection. Wi-Fi can still work, especially for lightweight home projects.
Should I replace the old laptop HDD with an SSD?
If the laptop supports an SSD upgrade, it is generally a useful improvement. Faster storage can make Debian, Nginx, applications and databases feel significantly more responsive.
Can I run the server 24/7?
An old laptop can potentially operate continuously, but you should monitor its temperature, cooling system, storage and power supply. Older hardware can have a higher risk of component failure.
Is an old laptop server free?
You can avoid paying for a separate hosting server because you already own the laptop, but a home server still consumes electricity and requires an internet connection. A domain name may also have a registration cost.
Final Thoughts
Turning an old laptop into a server is a practical way to reuse hardware while learning real-world server administration. With Debian 13 as the operating system, Nginx as the web server, PHP for dynamic applications and MariaDB for databases, an inexpensive old laptop can become a capable home web server.
Cloudflare Tunnel makes the setup even more useful when you want to publish a website without relying on traditional router port forwarding. The laptop can remain inside your home network while cloudflared maintains the connection to Cloudflare.
The most important part is to start small. Install Debian 13, get SSH working, install Nginx, serve a simple test page and then gradually add PHP, MariaDB and your applications. Once everything works locally, configure Cloudflare Tunnel and connect your domain.
An old laptop does not have to become electronic waste. With the right Linux setup and a little configuration, it can become a useful server for websites, development projects, experiments and learning.


